Setting up a server#
Requirements#
- A PC/VPS, running either Windows 10 or Windows Server 2019.
- Knowledge on how to port forward
- A Plutonium forum account
- Notepad++/Any other code editor
- A Copy of the game installed in
C:\gameserver\T6.
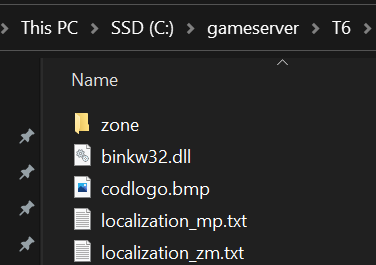
You don't need the video & sound folders, the .ipak files nor the SP level files, this can save you a LOT of disk space.
1. Preparation#
-
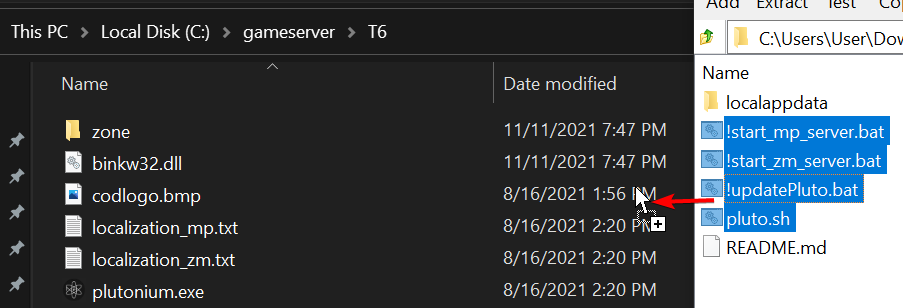
Download the Plutonium Launcher, and place it in your server folder.
-
Run
plutonium, so it can download the required files. -
Download the T6 Config Files
-
Move everything but the
localappdatafolder into the server folder.
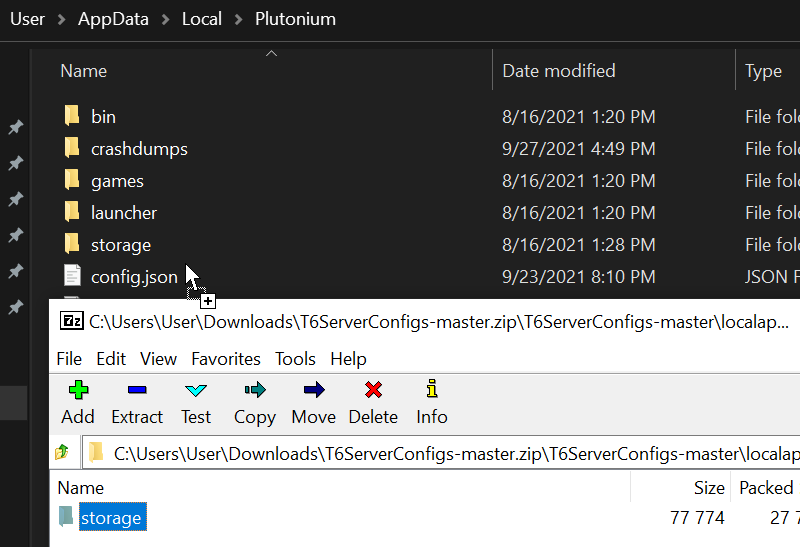
- Next, Press
Windows+Rand type%localappdata%\Plutoniumand move everything from inside the ZIP'slocalappdata>Plutoniumfolder into here.
1.2 Creating a server key#
-
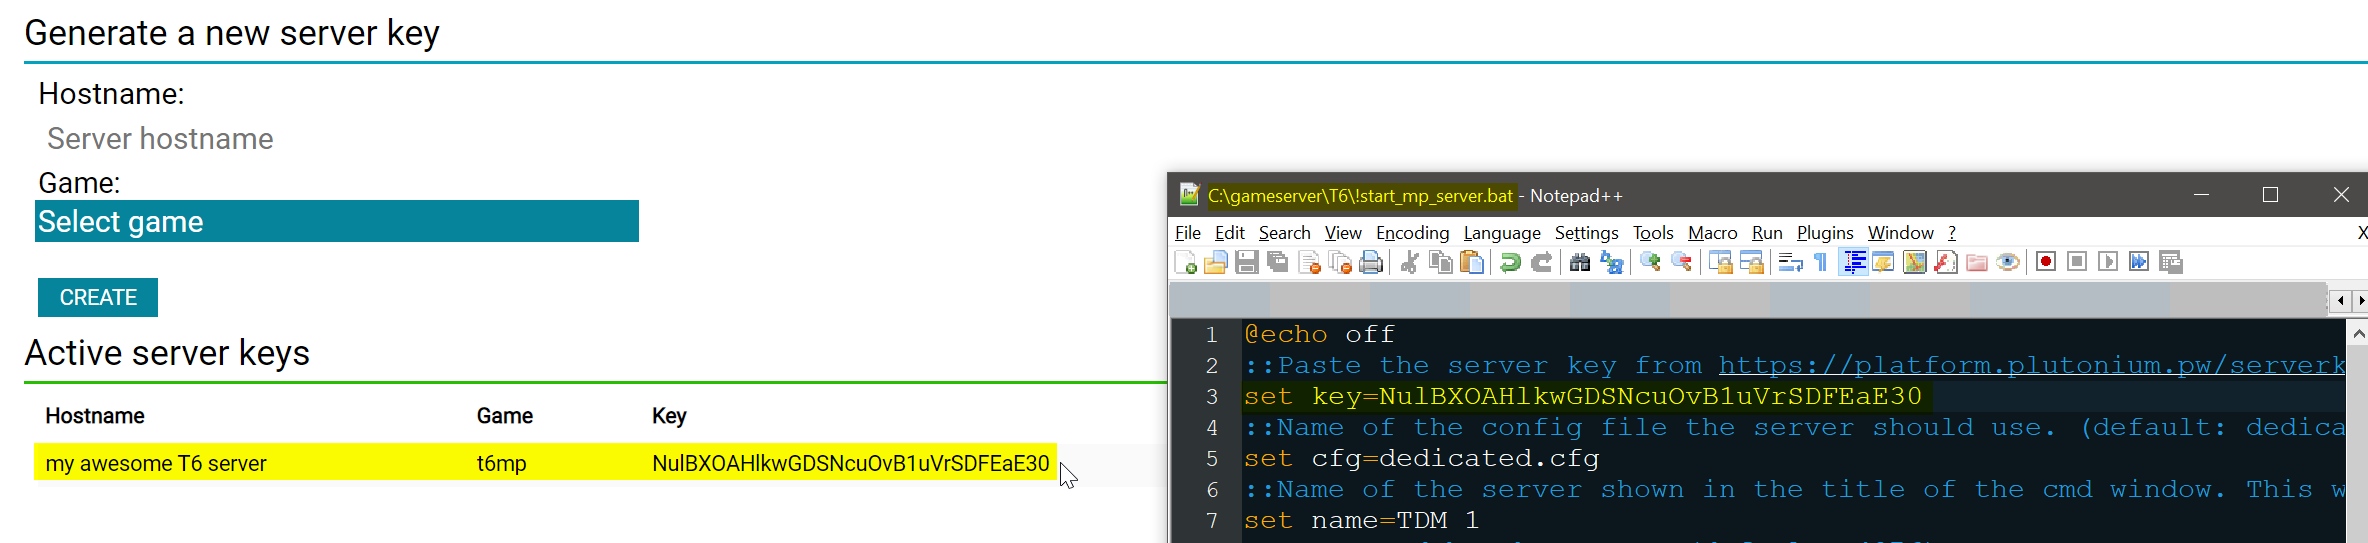
Open the Plutonium Server Key page.
-
Fill in the name of the server and select the correct game.
-
Click on create, then copy the server key.
-
Paste the key into the start bat under
set key=xxxx, replacexxxxwith your key.
2. Basic server configuration#
1. Open the start.bat file for the server you want, make sure you note down the port it is using. If you are hosting a server on the same machine you are running the game from, please change the port number to something different (4977 for example).
2. Edit your dedicated.cfg file with whatever changes you want (i.e. RCON Password/Map Rotation/Round Limits/etc/etc).
3. Double click the bat file.
4. Wait for the server to finish loading.

Port Forwarding#
Hosting a game server requires you to port forward to make your server accessible from outside of your network. Since every router is different we can't make a guide for every router so we recommend searching "your router name + port forward" on Google. Port forward the port you specified in your start.bat file.
You will also need to add the port to your Windows Firewall, refer to this Tom's Hardware article.
3. (Optional) Advanced configuration#
3.1 Custom settings (MP only)#
- Open the CFG of the game mode you want to edit (eg
tdm.cfg) in the/main/gamesettingsfolder. - Uncomment and edit the values of the settings you want to change.
- Save the file.
- Put
exec <game type here>.cfgin front of the firstmaptoken in the map rotation. For examplesv_maprotation "exec tdm.cfg map mp_la map mp_dockside map mp_carrier"
3.2 Enabling the hard core mode (MP only)#
- Either copy or open the game mode specific .cfg file for the game mode you wish to play with hard core settings.
- Open tdm.cfg and copy the hard core settings of it to the file from the first step.
- Save the file.
- Put
exec <cfg from step 1>.cfgin front of the firstmaptoken in the map rotation. For examplesv_maprotation "exec hctdm.cfg map mp_la map mp_dockside map mp_carrier"
3.3 Mixed game modes with correct / custom settings (MP only)#
- Open the server cfg file with Notepad++
- Put a
exec <game type here>.cfg(eg.exec dom.cfg) in front of a map token. For examplesv_maprotation "exec dom.cfg map mp_la map mp_dockside exec sas.cfg map mp_carrier"- You can have one exec token in front of multiple map tokens to apply your settings for each following map.
- You can have a different exec token in front of every single map token to have different settings for each map.
4 (Optional) Slimming down server directory#
1. Delete the players, sound, and video folders, if they exist.
2. Go into the zone folder.
3. Delete any language besides all, and english.
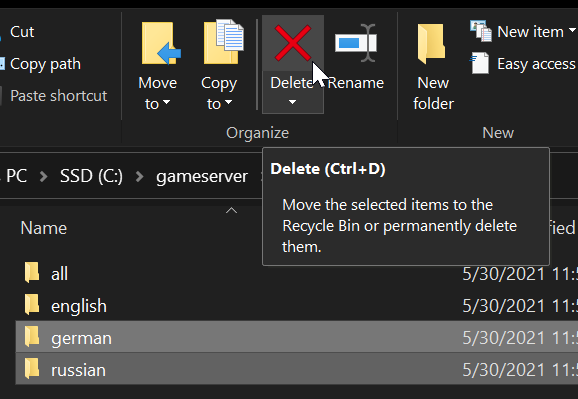
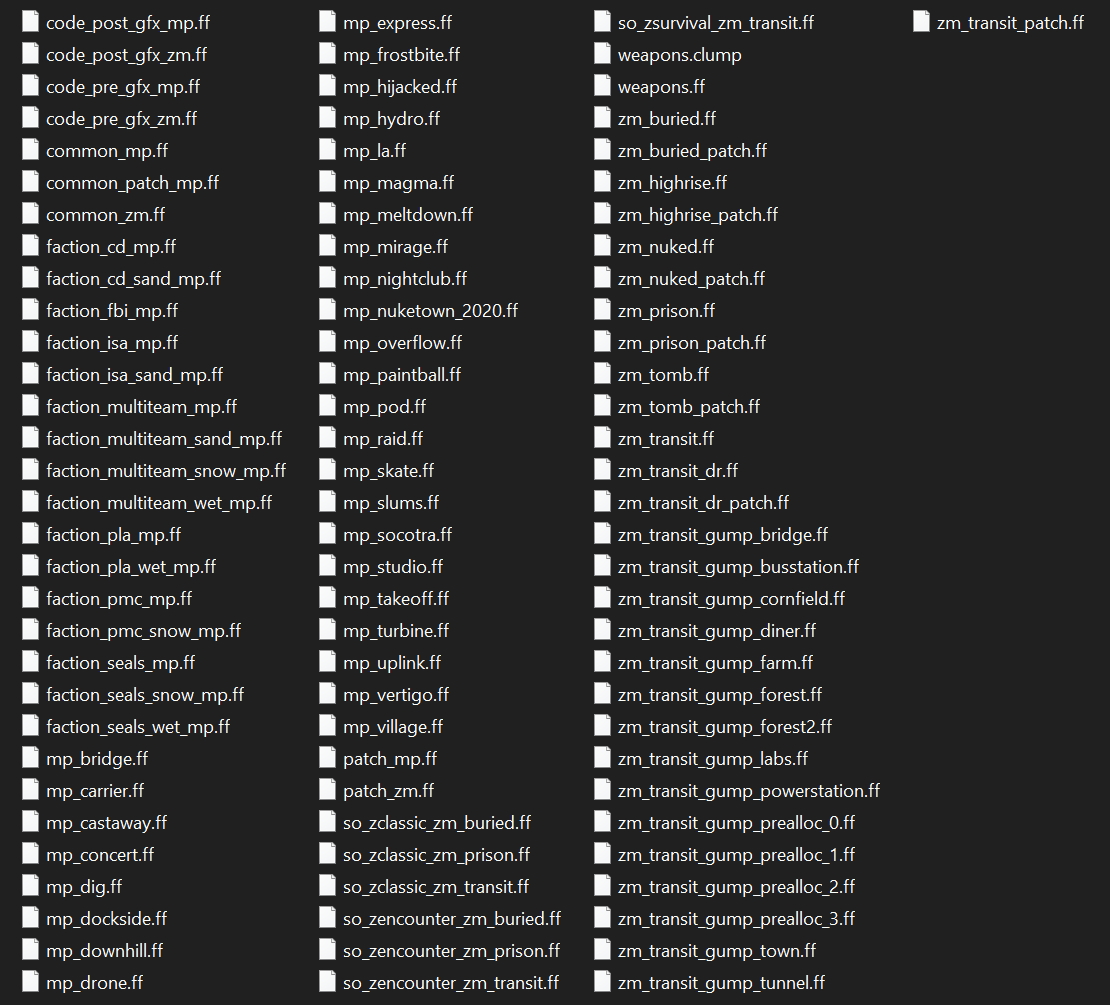
4. Now go into the all folder.
There are plenty of large files that we don't need.
All .ipak files and all sp files can be deleted safely.
Only files with mp and zm should be left in this folder.
In the end your all folder should look like this:
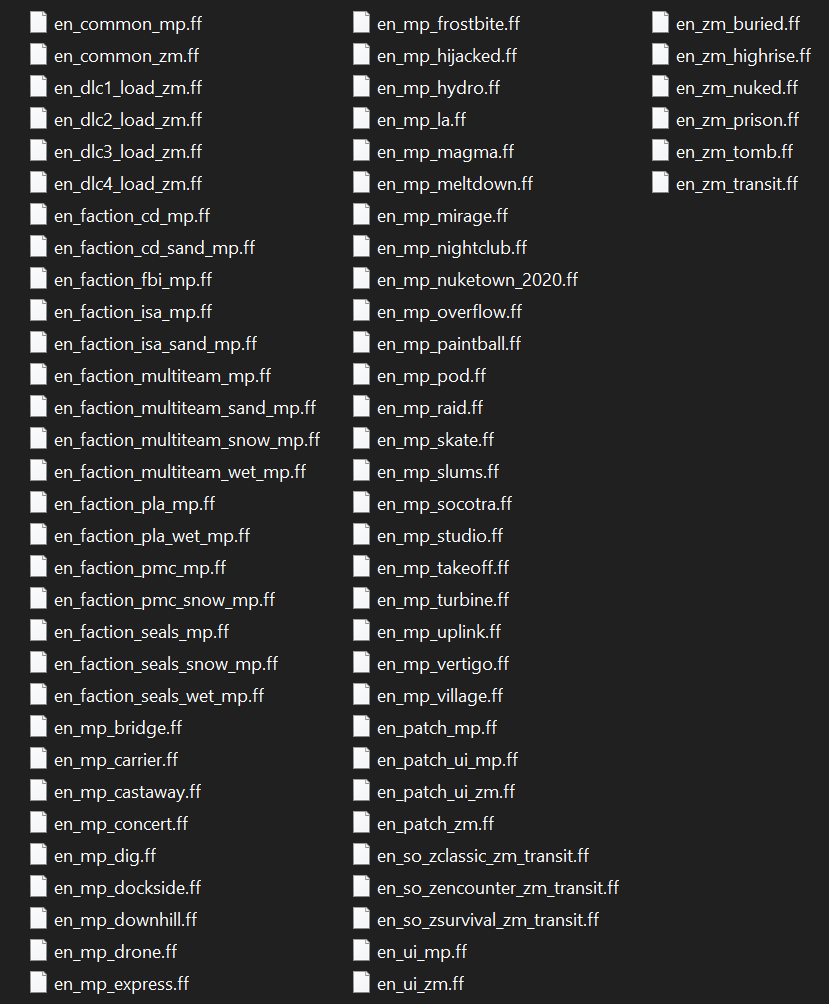
5. Now go back and into the english folder.
We do the same thing as above.
Your english folder should now look like this:
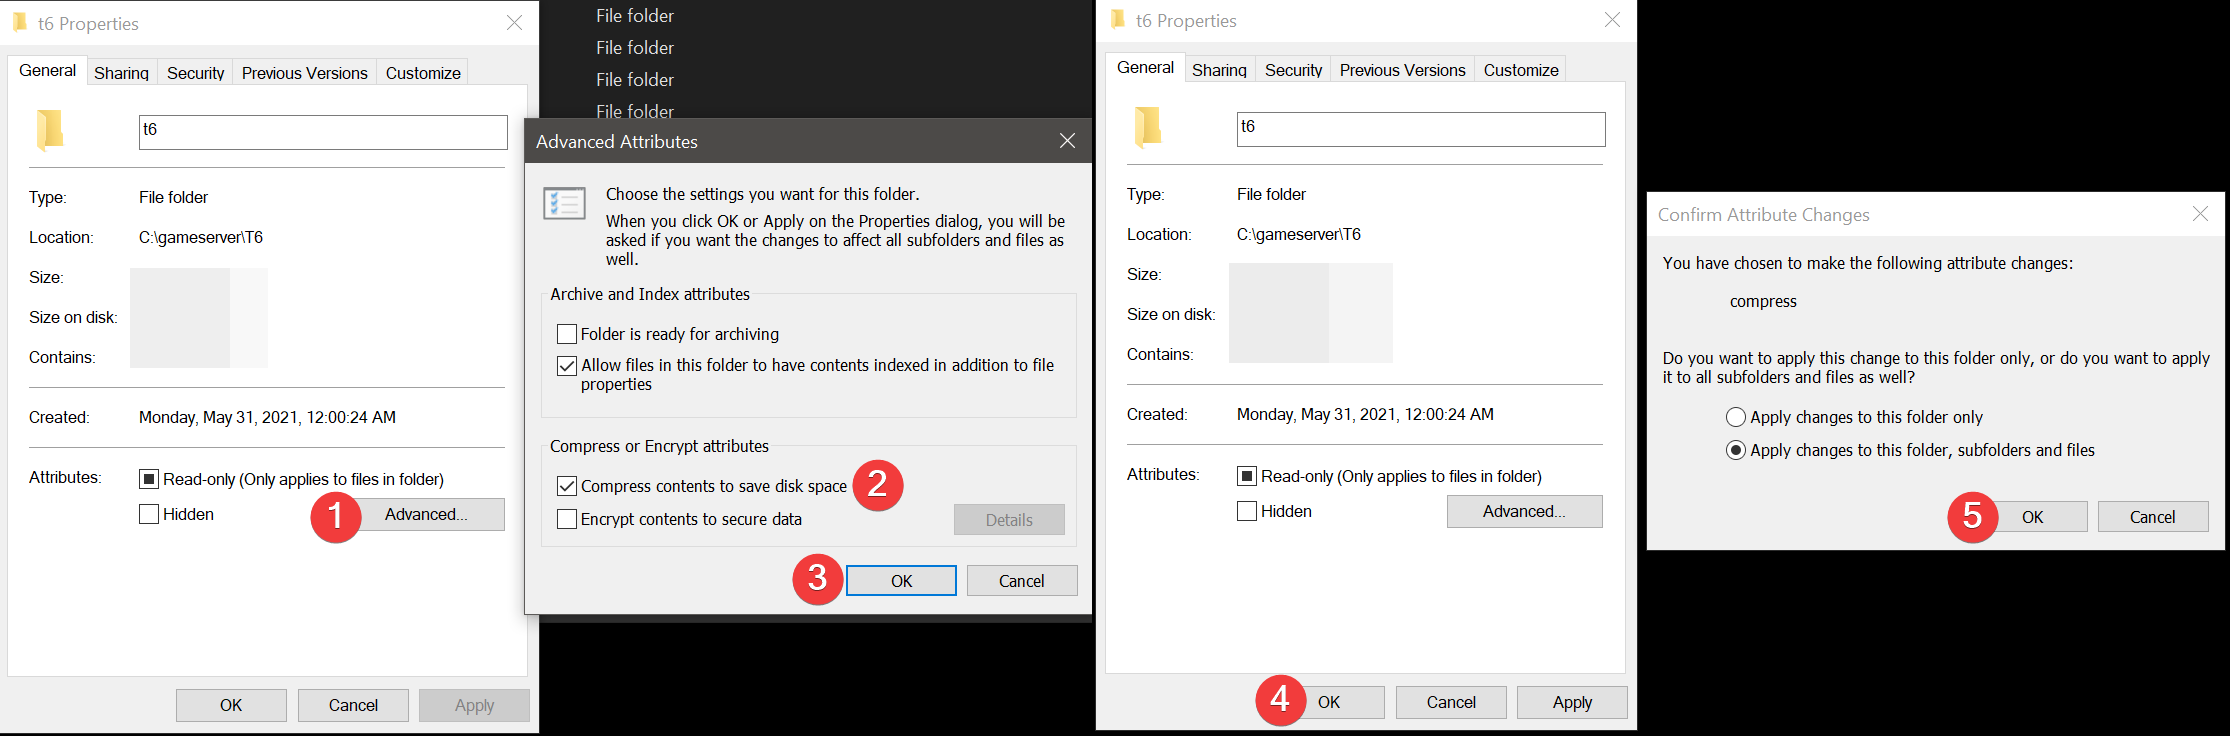
4.2 Enabling transparent compression#
This step is useful if you choose to enable game logs as it will save up to a GB per server.
- Open the properties of your
t6folder - Click on
Advanced... - Check the
Compress contents to save disk spacebox - Press OK
- Press OK
- Choose
Apply changes to this folder, subfolders and files - Press OK
5. (Optional) Install a server management tool (IW4MAdmin)#
Verify g_log "games_mp.log" is unique (in your dedicated.cfg file)
Set g_log to your server name for example if you are hosting a TDM and a Search and Destroy server your g_log's might look like this:
g_log "tdm_server.log"
g_log "sd_server.log"
Verify g_logSync is set to 2.
- Download .NET Core 6.0.x Runtime or newer [Windows]/[Linux].
- Download IW4MAdmin.
- Follow the IW4MAdmin setup guide.
6. (Optional) Hosting a second server#
Make a copy of the start.bat file and the dedicated.cfg file and rename them.
Edit the dedicated.cfg to meet your needs.
Edit the copy of the bat file to: use your new server key, use a new port, and use your new config file.
(You must forward the second port as well)
Start the server through the new .bat file.
Additional Notes / FAQ#
Why can't I find my server hosted at home while others can?#
Your router probably doesn't support NAT-Loopback (aka. NAT-Reflection) and that's why it doesn't know how to forward the network traffic. In order to connect to your server, open the console and type connect 127.0.0.1:yourPort
(If you are hosting on the same machine you are playing on), If not, you will need to find your servers private IP address (same one you used for port forwarding) and connect using that. For example: connect 192.168.1.5:yourPort
I can't open my game while my server is running?#
This is due to the client having a check that only one copy is open at a time. Simply start the client first, then your server. Note that if you do this, you will have to change your servers port to a different one as the client takes 4976 when it starts.
You said we can delete game files to save disk space, is it worth it?#
We recommend it, the files to host MP and ZM servers from the same folder with all maps and modes require roughly 1.7GB instead of 22GB and HIGHLY speeds up loading times as unnecessary files are not loaded.
Why does everyone get an time out during a map change?#
We are not entirely sure but it seems to be related to certain dvars not being set to their default value. Only known dvar to cause this is party_maxplayers.
On this page
- Requirements
- 1. Preparation
- 1.2 Creating a server key
- 2. Basic server configuration
- Port Forwarding
- 3. (Optional) Advanced configuration
- 3.1 Custom settings (MP only)
- 3.2 Enabling the hard core mode (MP only)
- 3.3 Mixed game modes with correct / custom settings (MP only)
- 4 (Optional) Slimming down server directory
- 4.2 Enabling transparent compression
- 5. (Optional) Install a server management tool (IW4MAdmin)
- 6. (Optional) Hosting a second server
- Additional Notes / FAQ
- Why can't I find my server hosted at home while others can?
- I can't open my game while my server is running?
- You said we can delete game files to save disk space, is it worth it?
- Why does everyone get an time out during a map change?